# 模板的本质
- 渲染函数
- 模板编译
- 编译的时机
# 渲染函数
渲染函数( h )调用后会返回虚拟 DOM 节点
实际上,Vue 里面的单文件组件是会被一个 模板编译器 进行编译的,编译后的结果并不存在什么模板,而是会把模板编译为渲染函数的形式。
这意味着我们完全可以使用纯 JS 来书写组件,文件的内部直接调用渲染函数来描述你的组件视图。
例如我们之前写过的 UserCard 这个组件,完全可以改写成纯 JS 的形式:
import { defineComponent, h } from "vue";
import styles from "./UserCard.module.css";
export default defineComponent({
  name: "UserCard",
  props: {
    name: String,
    email: String,
    avatarUrl: String,
  },
  setup(props) {
    // 下面我们使用了渲染函数的形式来描述了原本在模板中所描述的视图结构
    return () =>
      h(
        "div",
        {
          class: styles.userCard,
        },
        [
          h("img", {
            class: styles.avatar,
            src: props.avatarUrl,
            alt: "User avatar",
          }),
          h(
            "div",
            {
              class: styles.userInfo,
            },
            [h("h2", props.name), h("p", props.email)]
          ),
        ]
      );
  },
});
2
3
4
5
6
7
8
9
10
11
12
13
14
15
16
17
18
19
20
21
22
23
24
25
26
27
28
29
30
31
32
33
34
.userCard {
  display: flex;
  align-items: center;
  background-color: #f9f9f9;
  border: 1px solid #e0e0e0;
  border-radius: 10px;
  padding: 10px;
  margin: 10px 0;
}

.avatar {
  width: 60px;
  height: 60px;
  border-radius: 50%;
  margin-right: 15px;
}

.userInfo h2 {
  margin: 0;
  font-size: 20px;
  color: #333;
}

.userInfo p {
  margin: 5px 0 0;
  font-size: 16px;
  color: #666;
}
2
3
4
5
6
7
8
9
10
11
12
13
14
15
16
17
18
19
20
21
22
23
24
25
26
27
28
甚至也可以使用 Vue2 经典的 options API 的语法来写:
import styles from "./UserCard.module.css";
import { h } from "vue";
export default {
  name: "UserCard",
  props: {
    name: String,
    email: String,
    avatarUrl: String,
  },
  render() {
    return h(
      "div",
      {
        class: styles.userCard,
      },
      [
        h("img", {
          class: styles.avatar,
          src: this.avatarUrl,
          alt: "User avatar",
        }),
        h(
          "div",
          {
            class: styles.userInfo,
          },
          [h("h2", this.name), h("p", this.email)]
        ),
      ]
    );
  },
};
2
3
4
5
6
7
8
9
10
11
12
13
14
15
16
17
18
19
20
21
22
23
24
25
26
27
28
29
30
31
32
至此我们就知道了,Vue 里面之所以提供模板的方式,是为了让开发者在描述视图的时候,更加的轻松。Vue 在运行的时候本身是不需要什么模板的,它只需要渲染函数,调用这些渲染函数后所得到的虚拟 DOM。
作为一个框架的设计者,你必须要思考:你是框架少做一些,让用户的心智负担更重一些,还是说你的框架多做一些,让用户的心智负担更少一些。
# 模板的编译
单文件组件中所书写的模板,对于模板编译器来讲,就是普通的字符串。
模板内容:
<template>
  <div>
    <h1 :id="someId">Hello</h1>
  </div>
</template>
2
3
4
5
对于模板编译器来讲,仅仅是一串字符串:
'<template><div><h1 :id="someId">Hello</h1></div></template>';
模板编译器需要对上面的字符串进行操作,最终生成的结果:
function render() {
  return h("div", [h("h1", { id: someId }, "Hello")]);
}
2
3
模板编译器在对模板字符串进行编译的时候,是一点一点转换而来的,整个过程:
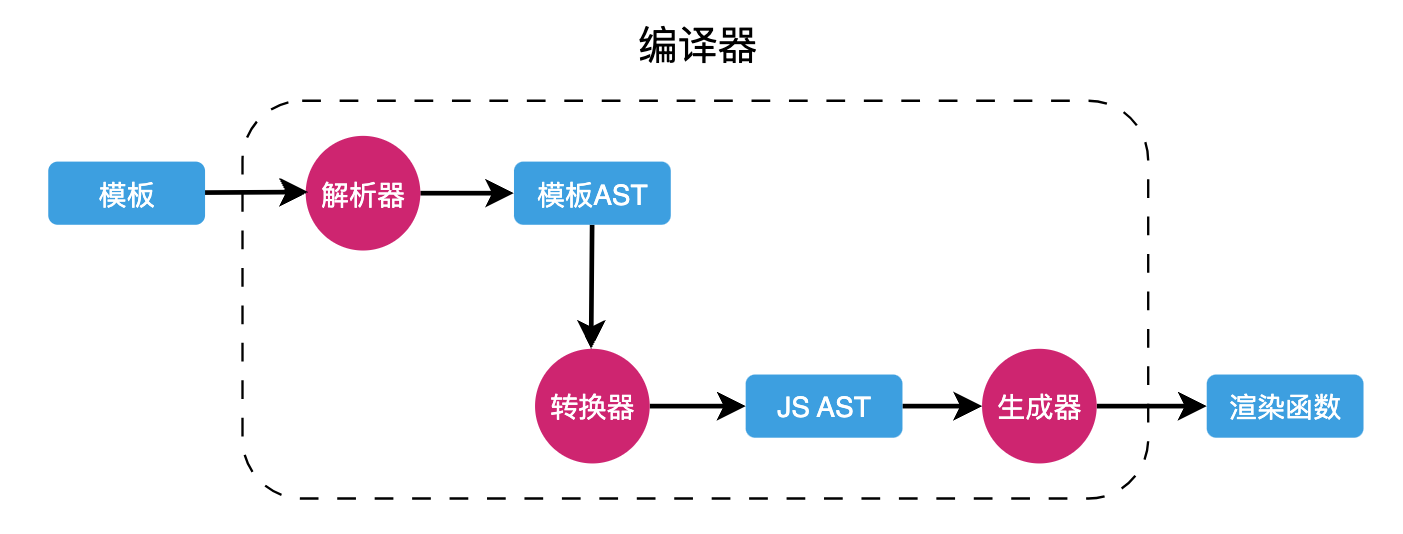
- 解析器:负责将模板字符串解析为对应的模板 AST
- 转换器:负责将模板 AST 转换为 JS AST
- 生成器:将 JS AST 生成最终的渲染函数
每一个部件都依赖于上一个部件的执行结果。
假设有这么一段模板:
<div>
	<p>Vue</p>
  <p>React</p>
</div>
2
3
4
对于模板编译器来讲,就是一段字符串:
"<div><p>Vue</p><p>React</p></div>";
首先是解析器,拿到这串字符串,对这个字符串进行解析,得到一个一个的 token.
[
  { type: "tag", name: "div" },
  { type: "tag", name: "p" },
  { type: "text", content: "Vue" },
  { type: "tagEnd", name: "p" },
  { type: "tag", name: "p" },
  { type: "text", content: "React" },
  { type: "tagEnd", name: "p" },
  { type: "tagEnd", name: "div" },
];
2
3
4
5
6
7
8
9
10
接下来解析器还需要根据所得到的 token 来生成抽象语法树(模板的 AST)
转换出来的 AST:
{
  "type": "Root",
  "children": [
    {
      "type": "Element",
      "tag": "div",
      "children": [
        {
          "type": "Element",
          "tag": "p",
          "children": [
              {
                "type": "Text",
                "content": "Vue"
              }
          ]
        },
        {
          "type": "Element",
          "tag": "p",
          "children": [
              {
                "type": "Text",
                "content": "React"
              }
          ]
        }
      ]
    }
  ]
}
2
3
4
5
6
7
8
9
10
11
12
13
14
15
16
17
18
19
20
21
22
23
24
25
26
27
28
29
30
31
至此解析器的工作就完成了。
接下来就是转换器登场,它需要将上一步得到的模板 AST 转换为 JS AST:
{
  "type": "FunctionDecl",
  "id": {
      "type": "Identifier",
      "name": "render"
  },
  "params": [],
  "body": [
      {
          "type": "ReturnStatement",
          "return": {
              "type": "CallExpression",
              "callee": {"type": "Identifier", "name": "h"},
              "arguments": [
                  { "type": "StringLiteral", "value": "div"},
                  {"type": "ArrayExpression","elements": [
                        {
                            "type": "CallExpression",
                            "callee": {"type": "Identifier", "name": "h"},
                            "arguments": [
                                {"type": "StringLiteral", "value": "p"},
                                {"type": "StringLiteral", "value": "Vue"}
                            ]
                        },
                        {
                            "type": "CallExpression",
                            "callee": {"type": "Identifier", "name": "h"},
                            "arguments": [
                                {"type": "StringLiteral", "value": "p"},
                                {"type": "StringLiteral", "value": "React"}
                            ]
                        }
                    ]
                  }
              ]
          }
      }
  ]
}
2
3
4
5
6
7
8
9
10
11
12
13
14
15
16
17
18
19
20
21
22
23
24
25
26
27
28
29
30
31
32
33
34
35
36
37
38
39
最后就是生成器,根据上一步所得到的 JS AST,生成具体的 JS 代码:
function render() {
  return h("div", [h("p", "Vue"), h("p", "React")]);
}
2
3
下面是一个模板编译器大致的结构:
function compile(template) {
  // 1. 解析器
  const ast = parse(template);
  // 2. 转换器:将模板 AST 转换为 JS AST
  transform(ast);
  // 3. 生成器
  const code = genrate(ast);

  return code;
}
2
3
4
5
6
7
8
9
10
# 编译的时机
整体来讲会有两种情况:
- 运行时编译
- 预编译
# 1. 运行时编译
例如下面的代码,是直接通过 CDN 的方式引入的 Vue
<!DOCTYPE html>
<html lang="en">
  <head>
    <meta charset="UTF-8" />
    <meta name="viewport" content="width=device-width, initial-scale=1.0" />
    <title>Document</title>
    <style>
      .user-card {
        display: flex;
        align-items: center;
        background-color: #f9f9f9;
        border: 1px solid #e0e0e0;
        border-radius: 10px;
        padding: 10px;
        margin: 10px 0;
      }
      .avatar {
        width: 60px;
        height: 60px;
        border-radius: 50%;
        margin-right: 15px;
      }
      .user-info h2 {
        margin: 0;
        font-size: 20px;
        color: #333;
      }
      .user-info p {
        margin: 5px 0 0;
        font-size: 16px;
        color: #666;
      }
    </style>
  </head>
  <body>
    <!-- 书写模板 -->
    <div id="app">
      <user-card :name="name" :email="email" :avatar-url="avatarUrl" />
    </div>

    <template id="user-card-template">
      <div class="user-card">
        <img :src="avatarUrl" alt="User avatar" class="avatar" />
        <div class="user-info">
          <h2>{{ name }}</h2>
          <p>{{ email }}</p>
        </div>
      </div>
    </template>

    <script src="https://unpkg.com/vue@3/dist/vue.global.js"></script>
    <script>
      const { createApp } = Vue;

      const UserCard = {
        name: "UserCard",
        props: {
          name: String,
          email: String,
          avatarUrl: String,
        },
        template: "#user-card-template",
      };

      createApp({
        components: {
          UserCard,
        },
        data() {
          return {
            name: "John Doe",
            email: "john@example",
            avatarUrl: "./yinshi.jpg",
          };
        },
      }).mount("#app");
    </script>
  </body>
</html>
2
3
4
5
6
7
8
9
10
11
12
13
14
15
16
17
18
19
20
21
22
23
24
25
26
27
28
29
30
31
32
33
34
35
36
37
38
39
40
41
42
43
44
45
46
47
48
49
50
51
52
53
54
55
56
57
58
59
60
61
62
63
64
65
66
67
68
69
70
71
72
73
74
75
76
77
78
79
在上面的例子中,也会涉及到模板代码以及模板的编译,那么此时的模板编译就是在运行时进行的。
# 2. 预编译
预编译是发生在工程化环境下面。
所谓预编译,指的是工程打包过程中就完成了模板的编译工作,浏览器拿到的是打包后的代码,是完全没有模板的。
这里推荐一个插件:vite-plugin-inspect
安装该插件后在 vite.config.js 配置文件中简单配置一下:
// vite.config.js
import Inspect from "vite-plugin-inspect";

export default {
  plugins: [Inspect()],
};
2
3
4
5
6
之后就可以在 http://localhost:5173/__inspect/ 里面看到每一个组件编译后的结果。
← 虚拟dom的本质 组件树和虚拟dom树 →